🌿 Effortless elegance for your dream garden—grow more than plants, grow a lifestyle.
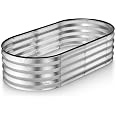
This 4×2×1 ft galvanized metal raised garden bed features a patented tool-free assembly for quick setup, durable 0.6mm thick zinc-coated steel for rust resistance, and a versatile design that fits any outdoor space. Backed by a 3-year warranty and a commitment to community support, it’s the smart, stylish choice for millennial gardeners who want quality and impact.
H**G
Well worth it.
Very sturdy and easy to put together. I have already ordered another one
K**A
Quick and easy to set up
We bought this for the toddlers to play with as their own “garden” (so they don’t dig up plants in the real garden). It’s working well so far! It’s held up through heavy rain and really windy conditions (about half filled with dirt and sticks) and the rubber around the top is nice because I feel like it makes it safer for the kids to lean over as they dig! Looks nice and was quick and easy to put together!
T**9
Affordable and easy to maintain
Great product! Easy to put together and they look great. Fast shipping. I got two of the bigger ones and a set of the smaller ones and they look fabulous 👌
M**Y
Easy to put together - but skip putting the rubber binder - it does not stay on
This is a really nice raised bed. It came with a rubber binder to protect the top. This does not stick to the metal at all. I had to glue and tape this to the edge.
M**H
assembly tips and more details about the garden bed quality
PACKAGING - First, the garden beds are packed very well in a box that was about 16x16x5. I ordered 8 of these at a time - the 4x2x1 with the dark wooden top. I bought all they had. They arrived separately (different days, some in boxes and some in the original container) and all were in good shape. The metal sheets had rubber corner protectors on them, and they were nested neatly in the box with thin foam in between each panel. I had no damage in any of the 8 boxes although some of the cardboard boxes were a little worse for wear.TOP EDGE - The tops of the aluminum sheets have a rolled edge so it's not sharp. There is a coating on the aluminum as well so I think it will hold up well in the weather. They have a 3-year warranty if you sign up for it.ASSEMBLY - EASY. The hardest part was unpacking everything! The boxes were sealed tightly with tape so it took my dad a bit of time opening and removing things while I assembled the beds. The first one took me about 30 minutes, and when I got the hang of it, each one took me about 10 minutes after that. I did not install the wooden tops at this point.UNBOXING - What you get in the package is this: 6 curved panels (3 per end) and 4 straight panels (2 per side). Each panel has a hole at the top and bottom vertically along the 5 ribs. The 2nd, 3rd, and 4th rib each have a die cut "tongue" on the left side and a slot to receive the neighboring tongue on the right (SEE PICTURE). These tongues (or tabs) will need to be pushed closed once assembled. I used a wooden block to preserve my fingertips. There were 2 more bolts and nuts per box than I needed. I don't know if there are extra screws for the wooden tops yet. It came with an allen wrench which I didn't need.HARDWARE - It comes with a bolt and a long "t-shaped" nut that covers the rest of the bolt's on the inside of the container. The nuts have grooves so they are easy to tighten (SEE PICTURE). I started with the curved end pieces, aligned the three tongues with the holes then put the bottom screw in. I opted to install the bracket on the top (only for those with the wooden frame on top) with the bolt and nut.WOODEN FRAME MODEL - For those of you who get the box with the wooden frame on top, the wood is decent enough but could benefit from a light sanding before weatherproofing although it should be fine if you pass that step. The installation is a T-shaped bracket that is bolted by the stem of the T to the top hole. The flat part of the T has four holes - two for the end of one piece and two for the end of the other piece where they join. The pieces fit together like a puzzle. What made sense to me was to install the brackets on the aluminum frame first; then, on the floor, assemble the wooden frame like a puzzle, bottom side up (SEE PICTURE); turn the container upside down to align the brackets with the teeny tiny pilot holes for the short screws to screw the bracket under the wooden frame. I can't imagine how tough it could be to try and align the tops with the holes in the way they tell you to install it. It was easy to assemble right side down and flip the bin upside down and screw them together that way. I had no problems. You just need to make sure the brackets are aligned equally at the joints so you don't split the wood. The wood is soft, but if you split it, you can use wood glue and put it back together.NOTES: (1) the ones with wooden tops do not have a center support rod or wire to hold the sides together and prevent the container from bowing out. I think the wooden frame should hold it in place. (2) I would recommend sealing the 10 seams with exterior silicone sealant. Many people say food/kitchen grade so that's what I'll use. This will prevent dirt and water from leaking out the vertical seams (SEE PICTURE) - don't forget the holes. (3) I do like the bolt and nut system better than some of the other things I found with competitor products that used regular nuts or wing nuts. These seem to protect the bolt better. VERDICT: I have sealed all seams AND HOLES from the "tongues" which is a MANDATORY step if you want to keep water from leaking out the sides. I used almost 2 tubes of clear kitchen-safe exterior silicone on 8 containers. Also CAULK IT IN PLACE - the containers flex when you carry them around so that could break the seal, so just put it where you want it and caulk it there.I placed these on my concrete driveway for my garden because I didn't want crabgrass growing up into the bed. I placed a 6mm sheet of plastic to protect the concrete from staining, then I added a straw seed blanket with the photodegradable mesh as the base to hold in the dirt. Then I added a layer of mulch to help fill the bucket. After that, I had about 3 cubic feet of raised garden bed soil to add. Miracle Grow's version is about $10 a bag for 1.5 cubic feet, so you need 2 bags for each container.Overall, I am really happy with these raised garden beds so far. I'll revise my review as time goes on because there are so many options out there, and I did a lot of research before landing on this one.Photos show the installation I used for the tops, all my containers lined up, the "tongues" on the panels, the gaps without caulk, and the big nut that goes inside at the top and the bottom of each panel.
S**A
Colorful Raised Garden Bed
I choose the color red which is more of a vibrant rust. Very pretty. They were very easy to put together. It probably took me about 15 minutes to put each unit together, I bought (2). The directions are well written with pictures and a QR code for video instructions, if needed. They appear sturdy enough for my planting and they have a center bracket for added durability. I'm deciding what color to purchase next. As these are a colorful addition to my garden.
W**1
New
This is wonderful, easy to put together very sturdy and an excellent price
K**R
Red planter
Really nice product. Good instructions that were easy to follow. It was just as described and the color was great. I'm looking forward to filling it and using it in the garden.
Trustpilot
2 months ago
2 months ago