Breathe Easy, Live Fresh! 🌬️
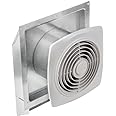
The Broan-NuTone 509 Through-the-Wall Ventilation Fan is designed for efficient air circulation in various indoor spaces. With a powerful airflow of 200 CFM and a noise level of 8.5 sones, it effectively eliminates unwanted heat, humidity, and odors. Its galvanized steel housing ensures durability, while the easy installation process makes it a practical choice for any home improvement project.


| Brand | Broan-NuTone |
| Color | White |
| Electric fan design | Exhaust Fan |
| Power Source | AC |
| Style | No Switch Dial |
| Product Dimensions | 14.25"D x 14.25"W x 8"H |
| Room Type | Kitchen, Bathroom |
| Special Feature | Without Light |
| Recommended Uses For Product | Indoor |
| Wattage | 25.4 watts |
| Finish Type | White |
| Air Flow Capacity | 180 Cubic Feet Per Minute |
| Blade Length | 8 Inches |
| Theme | Home Improvement/Ventilation |
| Voltage | 120 |
| Collection Name | Kitchen |
| Switch Type | Switch |
| Item Weight | 12 Pounds |
| Included Components | FAN |
| Indoor/Outdoor Usage | Indoor |
| Model Name | Through-the-Wall Ventilation Fan |
| Control Method | Touch |
| Blade Material | Plastic |
| Reusability | Highly Reusable |
| Efficiency | Relatively efficient |
| Is Cordless? | No |
| Number of Power Levels | 2 |
| Main Power Connector Type | NEMA 5-15P |
| Manufacturer | Broan |
| UPC | 026715022892 802991849404 |
| Global Trade Identification Number | 00026715022892 |
| Size | 200 CFM, 8.5 Sones, 8" |
| Brand Name | Broan-NuTone |
| Model Info | 509 |
| Item Weight | 12 pounds |
| Country of Origin | China |
| Item model number | 509 |
| Is Discontinued By Manufacturer | No |
| Part Number | 509 |
| Special Features | Without Light |
| Material Type | Alloy Steel |
| Batteries Included? | No |
| Batteries Required? | No |
| Manufacturer Warranty | 1 year limited warranty |
M**B
Happy Camper
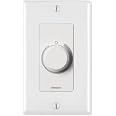
I am literally on my 3rd Broan 509 exhaust fan. They've lasted between 10-12 years and whenever I have one start to fail I replace with one that I bought after the previous one failed 10-12 years prior. I remodeled a bathroom last August and had the contractor replace the current 509 with one that I bought 12 years ago (I order another one right away so that if Broan stops making it I'll have a replacement ready to go and I'm good for another 10-12 years). For some reason this one was much louder than the previous two so I ordered the Broan SC100W variable speed switch and had the contractor install it. I usually turn the switch to about the 3 o'clock position and the fan is much quieter, but still pumps out enough moisture that the bathroom mirror stays fog free. I currently have a 509 in the box in my basement store room so I'll be good until about the year 2035 and I won't need to hope the model hasn't been discontinued. p.s., I also have purchased an additional SC100W variable speed switch in case that is discontinued. As a former boy scout, I am always prepared.
J**A
DIY’er
I did a little research before buying this fan. My bathroom was built without a fan in it and there was no way to out one above the existing shower. So the only way was through the wall to the outside. My house was built in 1952 so the walks are thicker. I honestly didn’t look at the instructions that came with it as I already had a plan. Cut out the hole on both sides. Put the outside hood in first. Once that was done I seen that it didn’t go all the way through. I was nervous but once I put the fan in there is holes for this purpose for how ever thick your wall may be. I bought the switch fan and everything turned out great. Super happy with this product and will probably buy another one for my other bathroom. The only down side is the fan is a little noisy but I don’t care my bathroom no longer has any steam in it anymore from the shower.
K**R
Not a easy do it yourself project
Installation instructions are confusing but not needed if you are a handy person. Order the fan filter at the same time
R**O
How to install in tight spaces
This describes how I installed a Broan 509 in a cinder-block wall basement, having only 12-inches of vertical relief (clearance between the ground and the aluminum siding at the bottom of the first floor). The outside wall cap / exhaust vent that comes with the Broan 509 Wall Ventilation Fan is enormous; a monstrosity. It was not going to fit. Instead I used the unobtrusive Air King BDD8R Back Draft Damper (8 Inch Round). Note: you have to remove a couple of Air King rivets to make it slip over the Broan duct-work. I fitted the outside wall with the 11-inch square MV 250/200 VJ ventilation grill (louvered shutters). This assembly (Broan+AirKing+Grill) allowed me to fit the exhaust within the 12 inch height on the outside wall.On the outside, the duct-work was a mere 2 inches above ground level. Place a metal screen behind the louvers on the ventilation grill. This keeps out any curious ground-level bugs. I also placed a gasket between the grill and the stucco wall. Slightly slope the duct-work downward, from-inside-to-out, just in case you get a heavy rain and water backs up into the duct-work.On the inside, use a plywood spacer between the flange on the Broan duct-work and the inside wall. This gives you the option to 'wedge cut' the spacer to make up for basement walls that are not straight, and for sloping the duct-work downward as mentioned above. Attach the Broan duct-work to the plywood spacer using small L-shaped brackets.Finally, it's nice to Thompson waterseal cuts you make in cinder-block walls, and to fill the inside of the cut cinder-blocks with Stuffit. I temporarily inserted a segment of 8-1/2 inch diameter duct-work into the hole (well-oiled) before stuffit-ing the inside of the cinder-block. Note: the Air King has a ridge making it about 8-1/2 inch diameter. After drying, I removed the temporary duct-work and inserted the finished Broan + Air King assembly. This stops any water seepage, and I can now easily remove the entire assembly should any future fixin' be called for, simply by unscrewing the plywood spacer from the basement wall.
K**I
Terrible to install, nothing retrofits with older models
Got this to replace a much older model (like 1950-70s) above my stove. Was hoping the parts were compatible as the size and brand were the same, however in the update they changed everything, including the distance between the screws on the bracket, the size and location of the junction box, and the size and orientation of the ducting, which impacted how it fit in the hole left behind when I removed the old one. It's not the easiest thing to install. The junction box is built in such a way that you couldn't possibly install it with knockout cable clamps already inserted. So I had to install the junction box and wiring BEFORE installing the fan box and ducting, and then put the whole thing into the wall after that, which is the opposite of what they tell you to do and was only possible because the wall was partially opened so I could install the cable clamps half through the hole in the wall. It might have been possible to use push in connectors to that purpose, but I'm not 100% sure and you'd have to thread the push-in backwards onto the cable before snapping it into the knockout, an uphill fight that could damage the cable. So still not ideal. They should definitely rethink that part of the design. The installation instructions were also not superb and as described above, not actually compatible with reality.But once I finally got the thing in there it works fine. So if you're the installer, you'll hate it, from just the homeowner perspective you probably won't. As other reviewers have said, it's very loud, but I got a compatible fan dimmer switch and that makes it very reasonable.
P**L
Very fast shipping!!! Great product!!!
Very fast shipping!!! Great product!!!
F**.
Too big too short a window to return!
Return time frame only 30 days by the time the handyman came to install and discovered it was too big no chance to return it.Gpo to lowes or home depot same product same price better return options.
Trustpilot
1 week ago
4 days ago