Illuminate Your Drive! 💥
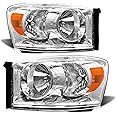
The ADCARLIGHTS Headlight Assembly is designed for 2006-2009 Dodge Ram models, offering a perfect OE fit, enhanced brightness, and easy installation. With an IP65 waterproof rating and lifetime service guarantee, these headlights ensure safety and reliability in all conditions.
| Manufacturer | FB |
| Brand | ADCARLIGHTS |
| Model | Ram |
| Package Dimensions | 63.5 x 43.18 x 40.64 cm; 6.35 kg |
| Item model number | 68003125AA/68003124AA |
| Exterior | UV COATING |
| Manufacturer Part Number | 68003125AA/68003124AA |
| OEM Part Number | 68003124AA, 68003125AA |
| Position | Front |
| Bulb Type | High/Low beam:H13(Bulbs not included) |
| Special Features | Dustproof and waterproof |
| Safety Rating | DOT and SAT Certified |
| Voltage | 12 Volts (DC) |
| Item Weight | 6.35 Kilograms |
A**R
Review
They look.good and arrived quickly and well protected . but I have not installed them yet . I’ll make an update when I do .
B**N
ADCARLIGHTS 2006 2007 (2008) 2009 etc.
These headlights are fantastic! A perfect replacement for my old oxidized original ones on my 2008 Dodge Ram 1500, they're really nice looking & fairly easy to install, took me less than an hour to replace both, makes my truck look great again & now I can see better at night! Great Products! Great seller! 👍 Thanks a bunch! Mr. Benny B.
J**K
Looks great.
Lights look great! And the extra contact after purchase on tech support and adjustments if needed. Just have to outsource new nut for lower anchor as mine were seized and nuts are not included.
N**E
Fit my 2008 dodge 1500 without lower amber strip perfectly.
Look great . Fit perfect .Would definitely buy again .Packaged very well .
M**E
Replacement Headlamp for 2008 Dodge Ram 1500 SXT with 252,624 miles
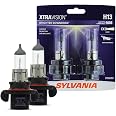
My truck is getting old (252,624 miles) and my eyesight at night is not what it used to be. So, after careful review and consideration, I decided to buy and install these aftermarket headlamp pods by ADCARLIGHTS along with separately purchased Sylvania H13 Ultra Life Capsules. This combination has worked out great cosmetically as well as functionally for my needs. Now the road is much brighter and clearer to me at night and allows me to see those pesky deer just waiting it jump out in front of me. These headlamp pods were not the least expensive, nor were they the most expensive lamp pods available. As an Industrial Engineer in the manufacturing of automotive headlamp industry for 30 years, I have to say for an aftermarket headlamp the design appears to be very close if not, the same as the original. This is why I decided to purchase and install this particular headlamp pod, along with the Sylvania H13 Ultra Life Capsules on my truck. When installing please note that it is extremely important not to handle your existing or new capsules or park/turn bulbs with your bare fingers. The oils from your hand will heat up and stress and eventually crack the glass allowing oxygen to enter the capsule or bulb causing pre-mature failure / reduce performance. I suggest installing the new capsules and bulbs to the existing connectors first taking care to handle by the base only or use nitrile gloves when handling. Then carefully engage the capsule / bulb connector to the molded features of the lamp pod until fully locked into position. Then you can engage the wire harness connectors to the appropriate capsule / bulb connector. To install the new headlamp pod, start by aligning the ball stud into the white ball socket which has been inserted into the sheet metal. Upon inspection, I decided to remove the new ball sockets that came with the new headlamp pods and re-use the existing ball socket already installed. Next press the ball stud into the ball socket firmly until you feel it engage, while aligning the lower threaded mounting stud and the two molds guide pins protruding from the housing of the lamp. Then start the threading of the 10mm nut onto the lower threaded mounting stud, but do not tighten as this time. Proceed to the two inboard mounting holes and insert and align the T30 Torx bolts in each hole and thread until you see the end of the bolt coming out of the fastener. Now press the headlamp inward again to seat all three points uniformly, (equally). Complete the threading of the 10mm nut until snug. DO NOT OVER TIGHTEN or you could break the housing or crack the housing boss. I would then proceed to the front lower T30 torx bolt and tighten until snug against the molded mount bracket and repeat for the upper T30 torx bolt. Again snuggly, DO NOT OVER TIGHTEN. The protective coating that has been applied to these lamps is intended to protect and slow the hazing process caused by the sun's ultraviolet rays. However, I am going to make it a practice to apply a spray on wax & dry spray wax to help repel rain and prevent water spots, plus help provide a clean surface, hoping that it will help preserve and prolong the protective coating. Please note these are only suggestions for handling and installation and I have no direct association with the manufacturer of these products or Amazon, this is simply my opinion. Hope this helps.
Trustpilot
5 days ago
3 days ago